How to Do a Valve Job
This can often be a quick and cheap project. Below is an example of one that won't be, though. Often, you'll go into an old engine and find things aren't worn much and the valves will just need grinding. Other times, you'll need to make everything like new. Your dealer may surprise you and have kits in stock for a 50 year old tractor. Otherwise, Valu-Bilt and many other dealers on the internet can get parts kits for you.
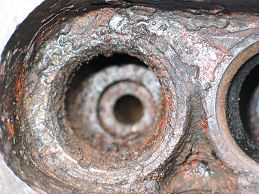
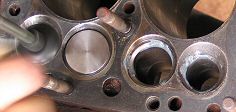
The exhaust seat needs replacement. The intake is fine.
First pull the valve cover (overhead models), head and side covers (flathead only). Life will be easier if you also pull the manifold, unless you break some studs. Go easy...maybe start a week early with the penetrating oil. Manifold nuts are supposed to be brass, but not everybody knows that and you can end up with a rusted mess.
Flatheads: Fords can be especially
easy, or just like the rest, depending on carbon accumulation. To
remove
the valve assemblies. At the top of the spring, as seen
through the side cover, grab the tab with a pair of pliars. Pull
down and out. You should be able to give it a tap and the
valve, spring and guide should slip out the top. If carbon
buildup prevents this, disassemble as follows. (This is how
most non-Fords disassemble, too) Compress the
spring and pull the keepers (You don't absolutely need a special
tool for this, but get one anyway). You might want to stuff
paper towels in the oil drain holes in case you drop something.
Pull the valve up. Pry the spring out. For Fords,
poke a
wooden dowel into the valve hole and rap as needed to drive the
guide out. If the keepers don't want to come out, support
the cup washer so that the valve sticks open. The whack the
valve head with a chunk of wood or a brass mallet.
The tappets (lifters)
should
stay in the same holes if you keep them. Slip them out one
at a time and check for cracks or severe wear. If the contact
point is worn, you may be able to dress it down with a grinder or
sander. Wind the screw in a little to loosen it up and give
you more clearance when grinding the valves. You will need
a special wrench to adjust them later.
If
you see wear on the valve stems, replace the valves and guides.
Kits are cheap.
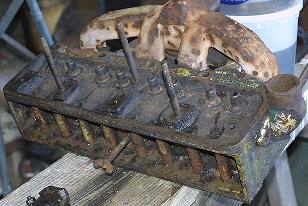 Case OHV
Overhead: Loosening a few nuts or bolts
will usually allow you to remove the rocker arms from the head.
Mind now, that the shaft may be in several pieces and a wrong
move will dump springs, shafts, rockers and towers into the far
corners of the shop.
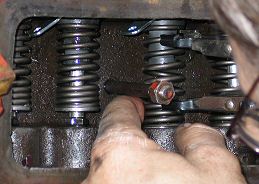
Now you can compress
the springs and remove the keepers. If the keepers are stuck,
put a shop rag between the bench and the valve head, place a socket
on top of the cup washer and give it a whack.
 This is how we face the valves.
Grind the valves and seats. If
you don't buy new valves, you will need to reface the valves, as
shown above. A
machine shop can do this for you or you can buy a tool from JC Whitney
for a few dollars.
Get some stick-on sandpaper and cut it
into tiny chunks to stick on valve face. Stick on at 120,
180 or 90 degrees. Drop in a guide (Fords), lube the valve stem and
drop it in. Make sure there is tappet clearance. With
a valve grinding tool, spin the valve until the sandpaper is worn
or the seat is smooth and free of pits. In extreme cases, you
can replace the seat. You might as well take it to the machine
shop if you don't have a well-equipped shop or are starting with
a real mess. The Case VAI head at the top of the page
normally would cost about $100 to clean up at the machine shop.
There was severe deterioration of the metal, though, and
some special work was required, running the tab to $260.
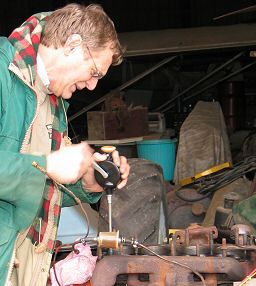
John
spins the valves. Gray stuff on seats is valve grind compound.
Lap the valves. Drop in a guide (Ford), put a dab of valve grinding compound on the seat, drop in the valve and spin it. Sears and the flea market junk shops offer a valve grinding tool (only the price is different) that you crank like an eggbeater. The back and forth rotation these make is a good idea, but ours fell apart after just a few valves. Use the kind that looks like a stick with suction cups on the ends. In reality, they are sticks with suction cups on the ends. Work it back and forth in your hands until the seat is smooth. Don't get so much compound on that it drips into places you don't want to wear out. Some compounds come in coarse and fine. Start with coarse. Don't get the valves mixed up after grinding. Do a good job of cleaning up the gritty compound when done.

New
Ford guides. The wide band holds the seal. The skinny
one is for the lock.
Reassemble.
For Fords, put new seals on the guides. If this operation seems difficult, it is because it is! It can be done, though. We think a minister or polititian (with strong hands from lots of handshaking) would be of great help with this. Drop the valve guide into the pocket. The skinny end goes in first. With a hammer and length of broom handle or brass drift, tap the guide into place. Go just far enough to put the retaining clip on and pry it back up. (Some people, including shop manuals, will recommend preassembling the valve, guide, spring, and keepers and installing as a unit. Yes, it can be a little easier, but it requires a special tool.)
All flatheads, make sure the tappets (lifters) are in place. Slip the spring over the guide and put the cup washer under it. Drop in the valve. Now, use a spring compressor (you can do this with two prybars, but it isn't fun) to squeeze the spring enough to slip in the keepers. Slowly release the spring to lock the keepers without removing any fingers.
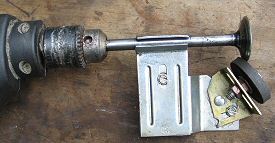
This
little spring compressor is designed for lawnmowers, but works on
tractors, too.
The silver tabs above the springs are the Ford
guide retainers.
Adjust the valves.
Flatheads. You will need a
thin openend wrench to turn the adjusting screws on the tappets
and a special tool to keep the tappet from spinning while you adjust.
Adjust the gap between the valve stem and the lifter, measuring
with a feeler gauge. A rule of thumb is that too much gap
is better than not enough.
Dad once said it's better to hear them a little, than not
at all. Unless your manual says otherwise,
go for about .012" on the intakes and .016" on the exhausts.
Re-install the side covers with new gaskets. Replace
the head when ready.
OHV. This is easy. Place
the head on its side so you have access to top and bottom. Some
engines use rubber cup seals on the tops of the valve guides. Now's
the time to put them on. Put the valves into their proper
holes. Place springs and cup washers over the valve stems
and then compress. Place the two halves of the keepers in
the grooves, pointy side toward the head, and ease off the spring
compressor. Repeat as needed.
Cleanup
and replace the lifter assembly. You'll have to adjust the
valve clearance after the head is re-installed.