|
Fireball, as found. Looks like a real ball of fire, yessir.
Jim revealed that the tractor was a 1951 Ford 8N. Neal wasn't that familiar with the models and "8N" was cast into the engine block. Jim is known to be quite a trader, but there it was in cast iron. "This is a good tractor," Jim proclaimed. "She smokes a little, but there ain't nothing loose on her. Old (deleted) down the road has one with a really good motor, but it's really loose. If you could take his motor and put it on this tractor, it'd be perfect." The "good tractor" part was repeated often and with great conviction, without ever quite stating that the engine wouldn't run. There was some talk about needing a little work on the carburetor and maybe the points weren't set quite right. But it was a good tractor. It would pull real good, except when the plugs fouled with all the oil it was burning. That was good, though, because he had never needed to change the oil... just add a quart or two every day. Yessir, that's a good tractor, but there might be some problem with the clutch, too. Indeed. Neal was pretty much aware of the tractor's condition and didn't plan to spend a lot of money. Jim had just acquired a "new" tractor that he was excited about and was still miffed at the problems of the Ford. This makes for an excellent time to trade. He didn't ask a lot of money. A deal was struck. Neal called John. "Congratulations," he said. "What for?" John asked. "You're the proud owner of a tractor!" "Oh, yeah? What'd I buy and how much did I pay for it?" After these discussions, the logistics of the first tractor quest were planned. Recovering Fireball was easy. Four guys rolled it down a slope onto the trailer. No fun at all! We'll tell you what we found wrong and what we did about it. This should be helpful to those with similar projects. Oh, the name? It has something to do with a stuck carb float valve! |
|
Our research uncovered the fact that the engine was a 1948 8N, but the tractor was mostly a 1943 2N. Elsewhere on the Internet you can find serial number guides, but we'll give you the quick version. Ford made the 9N, beginning in 1939. There were revisions as time went by, but the name was changed in 1942 to get around wartime price controls. This gave us the 2N. The famed 8N came about for the 1948 model year. 8N, with nothing else, was molded into the block near the starter ONLY in 1948. Major revisions for the 8N included a 4 speed transmission, different wheels, a little more power, and the famed "Red Belly" paint job. The 9N/2N was all gray. Ol' Fireball is what you might call a hybrid. |
First Step: Get it runningWe purchased a new 12volt battery as the system had been converted from 6 volts to 12. Everything turned, but there was no spark. We removed the distributor. This is a nuisance on the front-mount model. We cleaned and adjusted the points, which were not making contact. Taking care not to turn the rotor we reinstalled the distributor without having to adjust the timing. We would later give it all new tuneup parts. With the help of a little ether, the engine started, but had problems running. We changed the plugs. 3 and 4 had oil on them. We rapped on the carburetor. The engine ran fine, but with some smoke. There was NO ability to release the clutch. We started it in gear to run. We added a little cleaner to the oil before changing it. The hope was that the smoke was from stuck rings rather than wear. We later changed the oil and ran some more. The carb float stuck some, but we were happy. Assessment: |
|
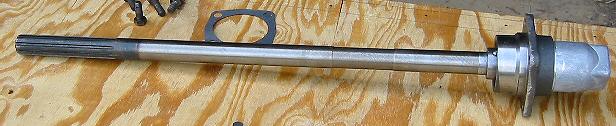
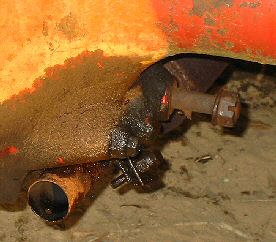
The PTO is noisy and the oil won't stay in. We removed 4 bolts and gave a tug on the shaft. The seal and bearings are shot, but we can't get them free of the assembly. The standard fix for anything loose on the tractor has been to weld it. This makes it impossible to change these parts. The good news is that a new assembly is available for $120. On this kit, the shaft is the current standard size, so we won't have to use an adapter to connect a modern pto shaft. Just scrape off the old gasket and shove in the new assembly. |
|
|
|
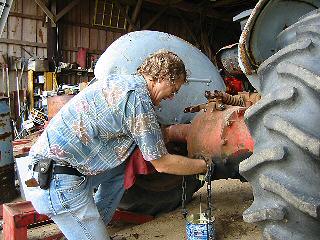
Above, John checks for broken metal
|
|
|
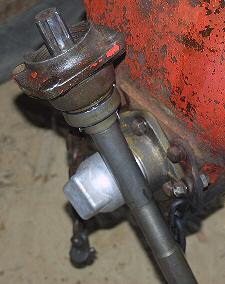
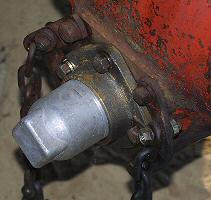
This leak on the differential looks simple enough. Just tighten the bolts on the stabilizer bracket, right? No! Not obvious here is the fact that the hole is not threaded. There is a castle nut and cotter pin on the other end. You could crank all day on that thing and it wouldn't get tight. Remove the four bolts that hold in the PTO and pull. Catch all the oil. Reach in and remove the cotter pin. We did this by threading a wire through the pin and then pulling from outside. NOW tighten the nut, replace the pin and PTO. If necessary, use a gasket and/or some sealer. |
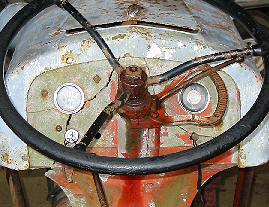
Electrical:Part of the wiring is delayed until a new instrument panel is acquired. First Step is to replace bad wire in good circuits, including battery cables. There were TWO red battery cables, offering some potential for trouble! Next, the alternator circuit was rewired. We bet it never worked. The Delco alternator has one large and one small terminal to battery. The other small terminal goes to battery through a diode and the ignition switch. You have to have the diode or an idiot lamp to prevent the alternator from backfeeding and keeping the ignition going with the switch off. Upon firing up, the ammeter shows no indication. The volt meter shows the battery is charging. Tapping on the ammeter, the needle moves. We need an ammeter. We will install that and the headlamp switch when the new panel is in. We found tractor headlamps for $8-12 at Walmart, Pep Boys, JC Whitney, Gempler's, Autozone, etc. |
|
Page is under construction. |
More soon. |
|
Update 11-14-04 We've been busy with a variety of projects, including making a living cleaning up after Hurricane Ivan and dismantling a gristmill. To give you a quick update, John has the Ford's engine back together and hanging on the tractor. The trans has some new parts. Along the way we discovered some dos and don'ts for the care and feeding of Fords. Fireball's biggest issue was cracked oil rings on two cylinders and need of a valve job. There was very little wear, so we suspect somebody broke the rings installing them. The front end parts have been cleaned, painted and/or replaced as needed. The sheet metal is painted and the fenders have been replaced with a pair by Harry Ferguson. The engine and clutch are back in and the front end is being rebushed. After some road testing of the freshened engine and frontend we will go into the back end where we will replace brakes, seals and bearings as needed. |
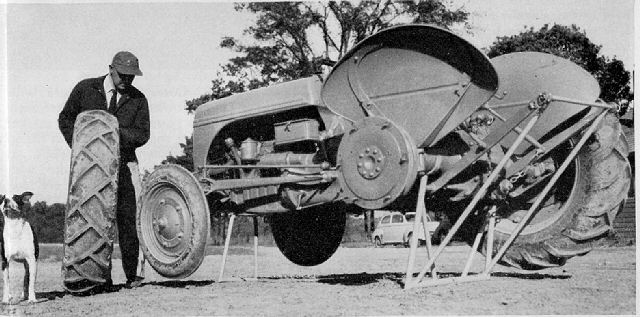
This
1940's photo shows a handy accessory. Anybody ever see one of these?